
So, you’ve got your new waist trainer and you’re ready to get that smooth, sculpted silhouette. But wearing one involves a bit more than just hooking it on and hoping for the best. The secret is to ease into it.
Think of it as a gradual process. The goal is to start with short wear times—just one to two hours a day—and slowly work your way up as your body gets used to it. The fit should always be snug but never painful. This approach lets the trainer mold to your unique shape and keeps you comfortable from day one.
Your Practical Guide to Waist Training
Welcome to your complete guide on making your waist training journey a success. We're here to help you achieve the silhouette you’re dreaming of and, more importantly, to help you feel confident and empowered every step of the way.
Forget those old, restrictive corsets from history books. Modern waist trainers are all about comfort, support, and enhancing your natural curves—not drastically changing them. This guide will walk you through everything you need to know.
What to Expect from This Guide
We've put together a roadmap to make sure you feel prepared and in control. This isn't just about putting on a garment; it's about learning how to use it as a tool for confidence.
Here’s a sneak peek at what you'll learn:
- Finding Your Perfect Fit: We'll break down how to choose the right size and style that aligns with your body type and personal goals.
- The "Seasoning" Period: You'll discover why breaking in your new waist trainer is a crucial first step for comfort and long-term results.
- Wearing It with Confidence: We'll share our best tips for making your trainer a seamless part of your daily routine.
The modern waist trainer has quickly become a go-to in fashion and wellness, and it's easy to see why. The global waist trainer market is projected to hit an incredible USD 266 billion by 2031, a boom driven by new designs and comfortable materials that deliver results.
A waist trainer should feel like a firm, supportive hug—not a restrictive squeeze. If you experience any pinching, sharp pain, or shortness of breath, it’s a clear sign to loosen the garment or take it off immediately.
To get the most out of your journey, it helps to understand the purpose behind the practice. You can check out our guide on what waist trainers are for to get a deeper look at their benefits.
We've also created a simple table to give you a quick overview of the first few weeks.
Waist Training at a Glance: A Quick Start Guide
This table summarizes the essential first steps to get you started on your waist training journey safely and effectively.
| Phase | Key Action | Primary Goal |
|---|---|---|
| Week 1-2 | Start with 1-2 hours per day. | Acclimatize your body and "season" the trainer. |
| Week 3-4 | Gradually increase wear time by 30-60 minutes daily. | Build comfort and endurance for longer wear. |
| Week 5+ | Aim for 6-8 hours per day, if comfortable. | Establish a consistent routine for optimal results. |
Our goal is simple: to empower you with the knowledge to wear your waist trainer safely and effectively, so you can look and feel your absolute best in any outfit. This guide is your trusted resource to make that happen.
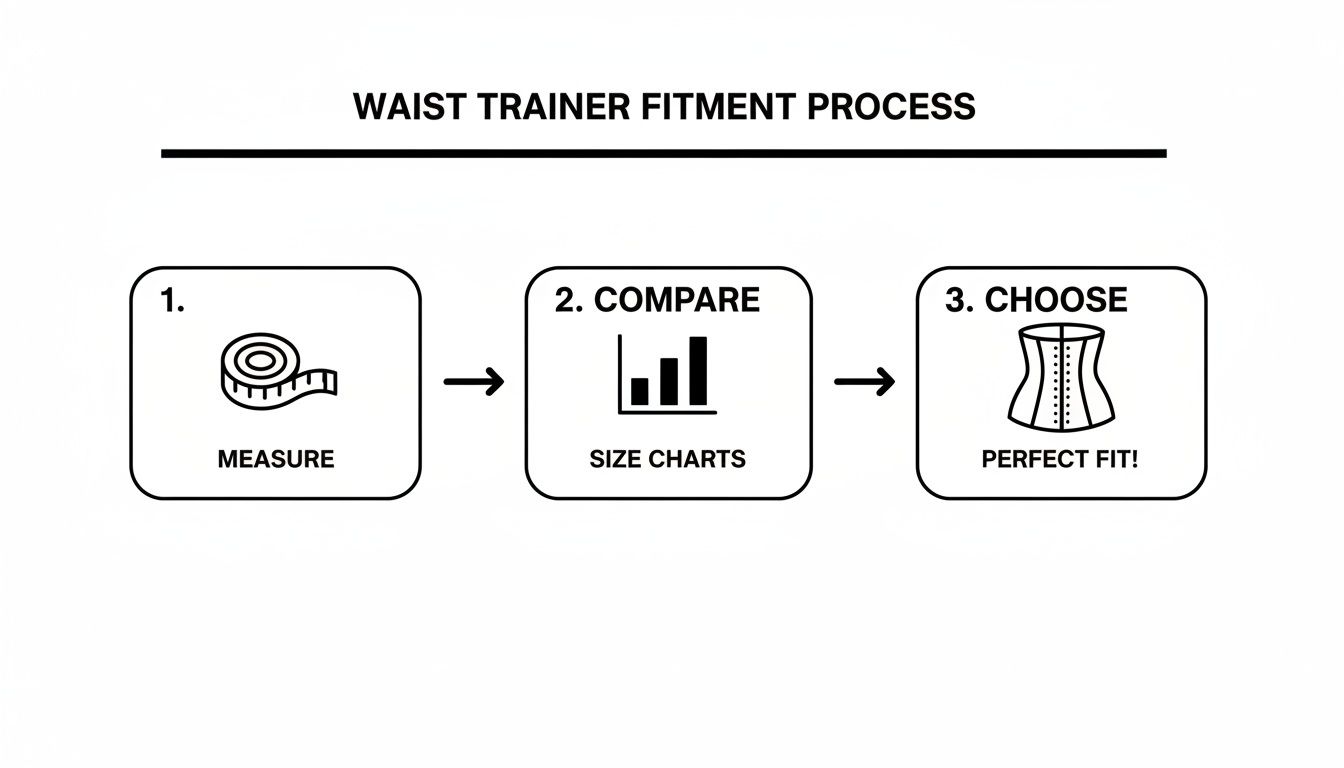
Finding Your Perfect Fit and Style
Choosing the right waist trainer is easily the most important step. Get this right, and you're set up for comfort, safety, and amazing results. Think of this as your personal guide—we're here to help you find a garment that feels like it was made just for you, so you can skip the discomfort and get straight to the confidence.
The absolute foundation of a great fit? Accurate measurements. It’s so tempting to guess your size, but that’s the number one mistake that leads to a trainer that rolls, pinches, or just doesn't deliver that smooth compression you’re looking for. All you need is a soft measuring tape to get started.
How to Measure for Your Waist Trainer
Getting your numbers right is a quick, two-step process that honestly makes all the difference. For the best results, measure against your bare skin.
- Find Your Natural Waist: Wrap the measuring tape around the narrowest part of your torso. This is usually about an inch above your belly button. You want the tape to be snug, but not so tight that it’s digging in. Breathe out normally, relax, and jot down that number.
- Check Your Torso Length: Stand up straight and measure the distance from right under your bust down to the top of your hip bone. This little step is key to knowing whether you need a standard length or a short-torso style.
So, what do you do if your measurement falls between two sizes? Let’s say your waist is 31.5 inches, and the chart shows a medium for 30-31 inches and a large for 32-33 inches. The golden rule is to always size up. A trainer that's too tight isn't just uncomfortable—it can be unsafe and create bulges instead of smoothing them.
Remember, we’re aiming for compression, not constriction. A perfectly fitted waist trainer should feel like a firm, reassuring hug. It supports you without ever making it hard to breathe or move.
Choosing the Right Style for Your Goals
Not all waist trainers are built the same, and the style you pick should be a perfect match for what you want to achieve. Are you looking for a boost at the gym, postpartum support, or that flawless silhouette for a big event?
-
Latex Cinchers: These are my go-to for daily wear and workouts. The flexible latex creates firm compression that ramps up thermal activity (hello, sweat session!), making it a super popular choice for enhancing your exercise routine. It’s also perfect for creating that smooth hourglass curve under your favorite t-shirt and jeans.
-
Steel-Boned Corsets: When you’re ready for more dramatic, long-term shaping, a steel-boned corset is your best friend. The rigid structure provides the ultimate support and compression. These are absolutely ideal for special occasions when you want a seriously defined waist under a formal gown or wedding dress.
-
Everyday Shapewear Cinchers: Think of these as your light and breathable secret weapon. Usually made from soft materials like nylon and spandex, they offer moderate smoothing designed for all-day comfort. They're perfect for the office or for creating a seamless line under a slinky dress without any intense cinching.
If you’re still exploring, our detailed guide on the best waist trainer for women is a great resource. It breaks down all the top styles based on different needs and body types.
Finding the Best Fit for Your Body Type
Your unique shape is everything when it comes to finding a trainer that you'll love wearing. What works wonders for an apple shape might not be the most comfortable for someone with a shorter torso.
For example, if you have a shorter torso, a standard-length trainer can be a real pain—literally. It might dig into your ribs or hips. Keep an eye out for styles specifically labeled "short torso" or "petite" that are cut to fit your proportions perfectly.
If you have a gorgeous plus-size figure, you'll want to prioritize trainers with a really robust construction. Look for features like multiple rows of hooks and high-quality steel boning. This ensures you get all the support you need without the garment rolling or buckling. I also love recommending vest-style trainers with shoulder straps for extra back support and a beautiful smoothing effect across the upper back.
Finally, think about your overall silhouette. If you have a pear or apple shape, a trainer with more coverage and control around the lower tummy might feel best, helping to create a beautifully balanced and streamlined look. The whole point is to find a piece that celebrates and enhances your natural curves in total comfort.
How to Put on Your Waist Trainer Correctly
Putting on a waist trainer for the first time can feel a bit like a puzzle, but trust me, it gets easier. After a few tries, you'll have it down to a science. The trick is to be patient and focus on getting a snug, comfortable fit, not wrestling it into submission.
First things first, always start with clean, dry skin. Don't apply any lotions or oils right before, as they can make the trainer slip and potentially irritate your skin. A great pro-tip? Wear a thin, breathable cotton tank top underneath. This protects both your skin and the garment, making the whole experience much more comfortable.
The Best Way to Fasten Your Trainer
When you're ready to hook it up, wrap the trainer around the narrowest part of your torso—that sweet spot right above your belly button. Stand up tall, relax your stomach, and whatever you do, don't suck in! Sucking in your stomach will only give you a false fit, leading you to fasten it way too tightly.
The secret to getting it on smoothly is to start at the bottom and work your way up. Fasten that very first hook near your hips. This anchors the whole thing and makes closing the rest of the hooks so much easier.
- Anchor from the Bottom: Secure the lowest hook first to hold the trainer in place.
- Work Your Way Up: Gently pull the two sides toward each other with one hand as you fasten the next hook with the other.
- Keep it Steady: Continue this process, moving up one hook at a time. A little bit of steady tension is all you need.
This bottom-up method gives you the best leverage and ensures the trainer sits correctly on your torso.
A great fit really is that simple: measure accurately, check the charts, and you're set.
Troubleshooting Common First-Time Issues
It's completely normal to hit a snag or two when you're just starting. The last few hooks at the top are usually the trickiest since that’s where the garment is tightest. Don't let it discourage you! Take a breath, stand straight, and use that steady pull to bring the sides together. If it feels truly impossible, that’s a good sign the trainer might be too small.
Another common problem is rolling. If your trainer is rolling down from the top or up from the bottom, that's almost always a red flag for the wrong fit. Rolling at the bust often means it’s too small or not long enough for your torso, while rolling up from the hips suggests it might be too big.
Snug is the goal, but pinching or pain is a hard no. Your waist trainer should feel like a firm, supportive hug. If you feel any sharp pain, numbness, or can't breathe comfortably, take it off immediately and reassess. Your body will always tell you when something isn't right.
Finally, remember that a brand-new waist trainer will feel stiff. That’s totally normal! The materials need a little time to warm up and mold to your unique shape. This is exactly why the break-in period is so crucial for getting that flawless, sculpted look you’re after.
Building Your Safe and Effective Wear Schedule
So, you’ve got your new waist trainer, and you’re excited to start. The biggest mistake we see people make? Trying to go from zero to one hundred by wearing it for a full eight hours on the very first day. Trust us, that's a surefire recipe for discomfort.
The secret to a great experience is all about the "seasoning" period.
Think of it like breaking in a new pair of amazing leather boots. You wouldn't take them on an all-day hike right out of the box, right? You wear them for an hour or two at a time, letting the material soften and mold to your feet. Your waist trainer is the exact same. This gradual break-in period allows the flexible boning and high-compression fabric to form to your unique curves, while also giving your body time to get used to the new sensation.
What is the "Seasoning" Period?
The goal for your first week is simple: get your body and the garment acquainted. You're not aiming for a personal best in wear-time; you're aiming for comfort and consistency. This is the foundation for a successful and enjoyable waist training journey, helping you avoid things like skin irritation or feeling way too restricted.
Slow and steady really does win the race here. For your very first day, just aim for one to two hours. That's it. Wear it while you’re relaxing at home, maybe watching a movie or doing some light chores. This isn't the time to hit the gym or wear it to a big event. It's all about getting a feel for it.
Your body is your best guide. The feeling should be a firm, supportive hug—never a painful squeeze. If you feel any sharp pain, dizziness, or shortness of breath, that's your cue to take it off immediately.
As the week goes on, you'll slowly add about an hour of wear each day. This gentle increase is what allows the trainer to truly customize its fit to you, using your own body heat and movement to shape the material. For a deeper dive into long-term wear, check out our guide on how long you can wear a waist trainer.
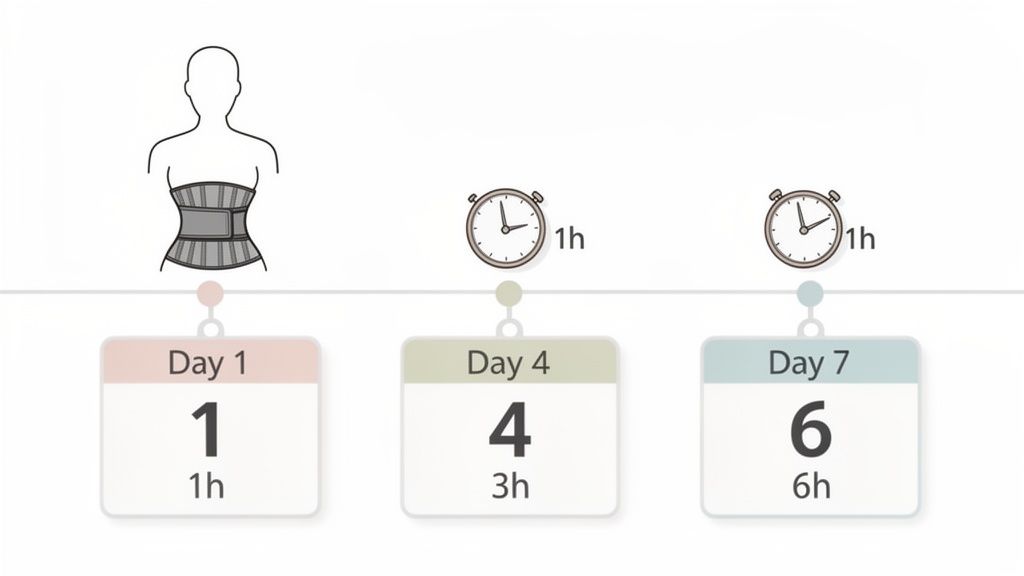
A Sample First Week Wear Schedule
Remember, consistency is way more important than how long you wear it for in the beginning. Following a simple plan like this one helps your body adapt without feeling overwhelmed.
Here’s a sample schedule to guide you through that crucial first week.
| Day | Recommended Wear Time | What to Look For |
|---|---|---|
| Day 1 | 1-2 Hours | Just getting used to the feeling of compression. |
| Day 2 | 2-3 Hours | Noticing the material is already starting to feel softer. |
| Day 3 | 3-4 Hours | Checking in with your body. Any discomfort? Loosen it a bit. |
| Day 4 | 4-5 Hours | Moving around should start to feel more natural. |
| Day 5 | 5-6 Hours | Your trainer is really beginning to mold to your curves. |
| Day 6 | 6-7 Hours | The fit should feel secure, almost like a second skin. |
| Day 7 | 7-8 Hours | You did it! Your trainer is successfully seasoned. |
By the end of the week, both you and your waist trainer will be ready for more regular, extended wear.
Listening to Your Body’s Signals
It's so important to know the difference between a normal adjustment period and a red flag from your body.
Feeling that firm compression and being more aware of your posture? Totally normal. Seeing some light indentations on your skin when you take it off (like you get from the waistband of leggings)? Also completely fine—they should fade quickly.
However, your body will tell you when something is wrong. Take the trainer off right away if you experience any of these warning signs:
- Sharp, stabbing, or pinching pains.
- Any numbness or tingling.
- Difficulty taking a full, deep breath.
- Sudden acid reflux or digestive issues.
- Bruising, chafing, or broken skin.
If any of these pop up, it’s a sign to stop and reassess. The trainer might be too tight, you might have worn it for too long too soon, or the specific style just might not be the right match for your body. Remember, this is about feeling good and enhancing your confidence safely. Your body always has the final say.
How to Style Your Waist Trainer Seamlessly
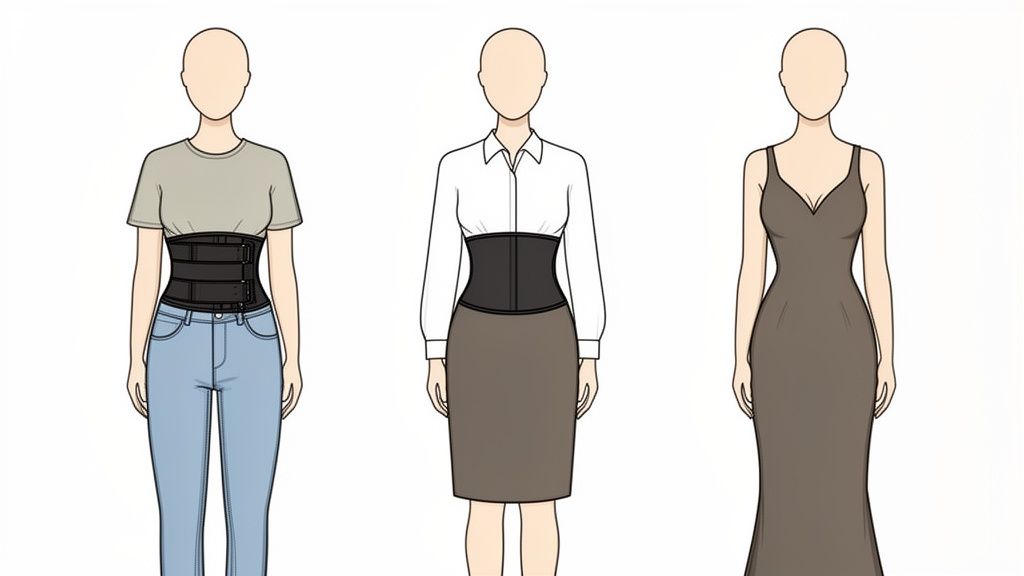
The real magic of a waist trainer isn't just the cinching—it's when it becomes your secret weapon, creating a flawless silhouette without anyone knowing it’s there. Knowing how to put one on is the first step, but styling it is an art. It all comes down to picking the right garment for your outfit and using a few smart layering tricks to keep things completely discreet.
Think of your waist trainer as a foundation piece, just like a great bra. When you get it right, it actually makes your clothes look better, helping them hang properly and fit in a more flattering way. The goal is always to avoid any tell-tale lumps, bumps, or outlines.
Pairing with Everyday Outfits
For daily staples like high-waisted jeans and your favorite t-shirts, a smooth, seamless cincher is your absolute best friend. These are usually made from latex or other soft, flexible materials that lie flat against your body.
Let’s say you’re wearing a fitted knit top. The key is to pick a trainer with no bulky seams or obvious hooks. A seamless, hook-free design is perfect here because it won’t imprint any texture through the fabric. If you’re working with thinner materials, like a simple cotton dress, just slip a thin camisole on over your trainer. It creates an extra buffer and guarantees a perfectly smooth finish.
Styling Under Professional and Formal Wear
When you're dressing for the office or a special event, the stakes are higher. You want clean, polished lines, and a visible waist trainer can ruin the entire effect. This is where your trainer's style and your outfit's fabric need to become a team.
If you’re wearing a silk blouse or a tailored business dress, reach for a trainer with a satin or smooth fabric finish. These materials create less friction, letting your clothes glide right over the top without any awkward clinging or bunching.
- For Fitted Tops and Blouses: A full-coverage vest-style trainer is a fantastic choice. It doesn't just cinch your waist; it also smooths out your back, getting rid of any potential "bra bulge" for a streamlined look from all angles.
- For Formal Gowns and Dresses: A steel-boned corset offers incredible structure, especially under heavier fabrics. But for slinkier materials like satin or crepe, a seamless cincher is a much safer bet—it won’t show the boning channels.
A good rule of thumb I always follow: match the structure of your trainer to the structure of your outfit. Heavier, more structured clothes can handle a steel-boned corset, while light, flowy fabrics need a seamless, flexible cincher.
Master the Art of Concealment
Beyond choosing the right trainer, a few extra tips can make sure your shapewear stays your little secret. The fabric of your clothing plays a huge role here.
Thicker materials like denim, ponte knit, and structured cotton are incredibly forgiving—they’ll hide just about anything underneath. Lighter fabrics? They require a bit more strategy. For instance, if you want to wear a waist trainer under a thin, body-hugging dress, look for one in a nude tone that disappears against your skin. This prevents any color from peeking through.
Finally, don't underestimate the power of patterns and textures. A patterned dress or a top with ruching can be your best ally. The visual interest naturally distracts the eye, making it nearly impossible to spot the lines of any undergarment. When you pair the right trainer with the right outfit, you can walk out the door feeling powerful and confident, every single time.
Caring for and Maintaining Your Waist Trainer
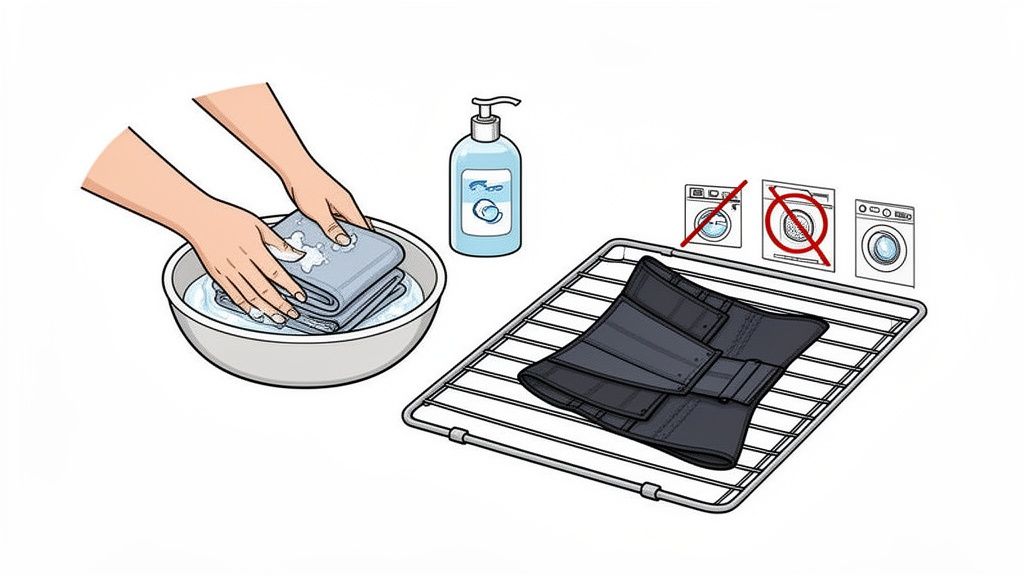
Just like any high-quality piece in your wardrobe, your waist trainer needs a little TLC to keep it working its best. Think of it as protecting your investment. Proper care isn't just about hygiene—it's what preserves the garment's lifespan, elasticity, and amazing shaping power. A well-maintained trainer will give you that consistent compression and support you love for much, much longer.
The biggest rule to remember? Never put your waist trainer in a washing machine or dryer. Ever. The intense heat, harsh detergents, and aggressive spinning are a total nightmare for high-compression fabrics. They can warp the flexible boning, destroy the latex, and ruin the garment's structure completely.
The Right Way to Hand-Wash Your Trainer
Hand-washing is the only way to go. It’s gentle, simple, and gets your trainer clean without causing any damage, effectively removing sweat and oils while keeping the fabric in perfect shape.
Here’s how to do it:
- Prep your washing station. Fill a sink or basin with lukewarm water and add just a tiny amount of a mild detergent. A gentle baby shampoo works wonders, too! You're looking for light suds, not a bubble bath.
- Give it a gentle bath. Submerge your trainer and let it soak for a few minutes. Then, use your hands to gently swirl it in the water and softly rub the fabric, paying a little extra attention to the inner lining. No harsh scrubbing needed.
- Rinse it clean. Drain the soapy water and refill the basin with cool, clean water. Rinse the trainer until every last bit of soap is gone. You can give it a light squeeze to get rid of excess water, but never wring or twist it. That’s a surefire way to damage the boning.
My Favorite Pro Tip: To keep things fresh between washes, just wipe down the inside of your trainer with a damp cloth and a drop of gentle soap after each wear. It's a game-changer, especially after a workout.
Drying and Storing for Lasting Shape
How you dry and store your trainer is just as crucial as how you wash it. Heat and bad storage habits can make it lose its shape in a hurry.
- Always air-dry. Lay your waist trainer flat on a clean towel or drape it over a drying rack in a spot with good airflow. Keep it out of direct sunlight, as those UV rays can break down the elasticity in the latex over time.
- Make sure it's bone dry. Before you even think about putting it away, ensure it's 100% dry. This prevents any mildew or musty odors from developing, which can take up to 24 hours.
- Store it flat. The absolute best way to store your waist trainer is to lay it flat in a drawer or on a shelf. Avoid folding or rolling it up, as this can create permanent creases and put unnecessary stress on the boning.
So, how often should you wash it? If you're wearing it to the gym, you’ll want to wash it after every single use. For daily wear over a tank top or cami, giving it a good wash after every 3-4 uses is the perfect routine to keep it fresh and in flawless condition.
Your Top Waist Training Questions, Answered
Let's be real—even when you're excited to start, a few questions always pop up. Think of this as your go-to guide for those "is this normal?" moments. We've got you covered with quick, honest answers to help you feel confident every step of the way.
Can I Wear My Waist Trainer to Bed or to the Gym?
This is a big one, and the answer is a firm no for sleeping. A traditional steel-boned corset is just too restrictive for a good night's rest and can interfere with your natural breathing and movement.
When it comes to working out, you need a different tool for the job. Never wear your everyday corset to the gym. Instead, look for a fitness-specific trainer, usually made from a flexible, sweat-inducing material like latex. These are designed to move with you.
The golden rule? Always listen to your body. If you ever feel dizzy, short of breath, or experience any sharp pain during a workout, take it off immediately.
Help! My Waist Trainer Keeps Rolling Up (or Down). What Gives?
Ugh, the dreaded roll. This is almost always a sign that the fit isn't quite right.
If it’s rolling down from your bust, your trainer might be too small or, more likely, too short for your torso. If it’s rolling up from your hips, it's probably a bit too large in that area.
Time for a Quick Fit-Check: Grab that measuring tape again! Re-measure your natural waist and your torso length, then double-check it against the sizing chart for your specific garment. If rolling is a persistent issue, a vest-style trainer with shoulder straps is a game-changer. Those straps anchor it perfectly in place, making rolling impossible.
Are These Marks on My Skin Normal?
After a few hours of wear, seeing some light, temporary indentations on your skin is totally normal. Think of them like the lines you get from the waistband of snug leggings or socks—they should fade within an hour or so.
However, some marks are red flags. Your skin should never show:
- Sore, angry red marks that stick around for hours
- Any chafing or broken skin
- Bruises of any kind
Seeing any of these is a clear signal that your trainer is too tight, you've worn it for too long before your body was ready, or you need a buffer layer. Always, always wear a thin, breathable camisole or tank top between your skin and the trainer. It makes the experience so much more comfortable and protects your skin from irritation.
Ready to find the perfect foundation for any outfit? Explore the curated collection of high-quality shapewear at Snatch Store US and discover the confidence that comes with a flawless silhouette. Find your perfect fit today at https://snatchstore.us.
0 comments